Wood and Stone

A site to track our progress as we build our FirstDay Cottage Canadian house kit. Come on in, get a cup of coffee, set a spell and follow along on our journey or join in if you like. Check back for the weekly update (usually by Wednesday when things are going right) to see what we are currently up to!

Tuesday, May 29, 2007

Under Pressure

We had a couple of days off - Sunday's weather was less than stellar, so we decided to get some things done around the house, and then for Memorial day, we set off and Emmet threw up five minutes out of the driveway. After a bath and a nap, we decided to try again and headed off to Grandma Lana's house. He was sick again, but we made it. When we finally got up to the site, we realized that we had forgotten the fittings for the manifold - they very thing we had hoped to finish! Well, it seemed that someone had not intended for us to work that day, so we packed it in for the day.

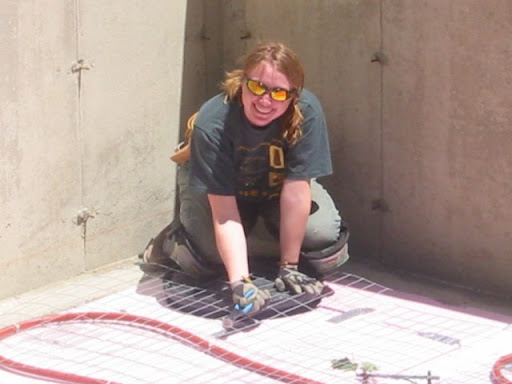
Today we tried it again. After some grunting, heaving and sweating (it's amazing how hot a basement hole full of insulation can get - as Wendy quipped, "Why do we need radiant down here? It's plenty warm already!"), we had the manifold and the loops all hooked up.

The manifold with PEX attached and 50 lbs of air in it.
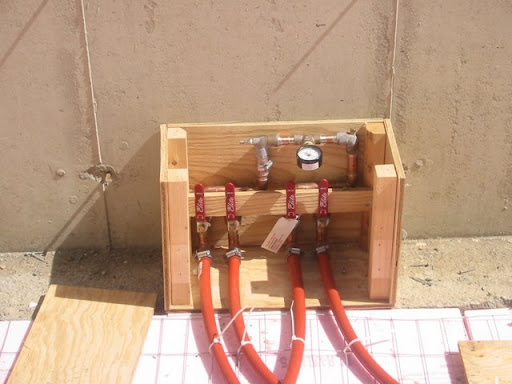
We filled the system with 50 pounds of compressed air to pressure test the fittings and went to get some breakfast. A few sausage, egg and cheese sammiches later, we came back to check the pressure. It had actually gone up to 55 pounds due to the tubing heating up and held pressure for 2 hours. During that time we tied the tubing all the way down to the bottom layer of wire mesh. Once the pressure test was complete, we put down the top layer of wire mesh and tied that down, trimming all the zip ties so that we don't have any flying up out of the finish floor slab. The top layer helps weight the tubing down, protect it from the power trowel in case it rises and diffuse the heat more evenly.


Installing the second layer of wire, cutting the mesh with bull-nose dykes (the blue handles tool in her hand).
All that is left to do before the slab pour is to build out the box for the under tub access and stuff it, stuff the manifold box and wrap the toilet pipe in cardboard so that there is a gap for the flange to be fit on after the pour. We cut out early for a early birthday party for Sean and cousin Danny (born the same exact day!) thrown by Grandma Lana and Aunt Sandra.

Saturday, May 26, 2007

The radiant spectrum

Since the plumbing passed, we started removing two inches of gravel between the footings for the insulation under the radiant tubing in the slab. Well, after seeing how tough that was, we decided to cut back to one inch of insulation, given how the slab is underground by at least 4 feet in all places. Even so, one inch across the entire basement (720 square feet, less the footings - 8" per side on the perimeter and two interior footings of 2 feet by 19 feet) is a huge amount of gravel to move.

Wendy enlisted the help of the kids and Grandma Lana one day while I was at work, and they moved quite a bit of gravel out of the cellar hole and onto the driveway. The next day, she and I finished it up and then laid down the foam insulation, followed by the wire mesh to attach the PEX radiant tubing to.

Foam laid flush with footing and wire mesh over it for attaching tubing
We needed a bit more wire to finish covering the foam, which we got before starting to deal with the PEX. In opening the first box of PEX, we found that the tubing was kinked somewhere in the middle. Kinked so badly that there was a crease in the tubing, which is no good. I made the mistake of trying to uncoil the first three hundred foot coil of PEX to help get rid of the pressure on the kink and determine how far in the kink was. This exercise shortly led to quitting in frustration for the day. Radiant heat tip number 1: Don't uncoil the tubing. Keep it coiled as much as possible, and spin the entire coil to loosen the twist in the tubing as you need it. This will keep the tubing from going everywhere as well as maintain your sanity.

The beast trying to crush me in its massive coils
By the next morning I had figured this fact out in my head, as well as the way around it. We decided we should start with the other coil of PEX in hopes that it was not so badly damaged. We got the first loop laid out and noticed that the tubing has the length printed on the side of the coil. Our first loop took two hundred twenty five feet of PEX, and the other loop is smaller because we can't lay it on the heater footing. Looking over the first roll, we determined that the kink was around one hundred and five feet into the roll, and that if we started from the three hundred foot mark, we would have almost two hundred feet of good tubing to use. By doing this we were able to get both loops of tubing laid and zip tied down.

Both coils of tubing laid, awaiting the pressure test
Now we simply have to make the connections to the manifold and pressure test this baby so we can have the inspector look at it and get the floor poured (finally!).

Climbing the north face of the Kelly Footing
Climbing. The world's loneliest sport, where hardship and philosophy go hand in glove. And here, another American expedition, attempting to be the first woman to successfully climb the north face of the Eastern Interior Kelly footing. She has been climbing tremendously. Documentary cameras were there to film every inch.

Monday, May 21, 2007

Plumbing: Mission 1 - Complete!

Sean's tips for would-be plumbers (v1.0):

1) You can do it. Yes, you read that right. You can do it. You are good enough, and smart enough and gosh darn it, plumbing ain't rocket science. I have known some good plumbers, but they aren't making giant strides for humanity or anything like that. They follow the code and get the job done. That said, if you are building your own house, I see why FirstDay recommends you get a contractor to do the mechanical systems for you - we haven't even gotten the kit yet and there is more than enough to do without dragging pipe, digging trenches in the under-slab gravel and so on. Not to mention the anxiety that comes of worrying about if it is right and whether it will pass inspection or not. On the other hand, perhaps that last is a side effect of breathing too much purple primer.

2) Get the biggest cans of cleaner, purple primer and pipe cement you can find (assuming you are using PVC pipe for your DWV). It costs a buck or two more, and you won't use all of whatever size you buy in a million years, but the secret is that you get a bigger applicator/dauber with the bigger can, which is worth its weight in greenbacks, believe me. The applicator is basically a cotton ball attached to a wire that is welded to the inside of the can lid. The small jar has a cotton ball that is maybe 3/4" in diameter. The large can has a cotton ball that is 1 1/2" in diameter. I made the mistake of getting big cans of purple primer and cement and a smaller can of cleaner. By the third or fourth joint we made, I was begging for the bigger applicator.

3) Push those pipes together tight for 30 - 60 seconds after making the joint! The instruction say this, to avoid push out. And you think - c'mon! How much will the pipes push apart? Our first 4" pipe joint came all the way out of the 2" deep hub because we hadn't held it until the chemical reaction was done.


Wendy and I finished up the under-slab Drain/Waste/Vent line yesterday. We started it last Saturday, so it took about a week and a day of nights and weekends to do. Things weren't too bad until we got to the point where the system turns 90 degrees to exit the house (see below - the dark green is the underslab DWV and the light green indicates the risers coming up out of the slab).

Under-slab DWV plumbing plan for posterity
At that point, things got a little tight, as there was a 3" rise in about 5 feet between the sleeve going out of the house and the sleeve going to the bathroom. We had assembled the pipes backward from where they enter the slab, back toward the house exit (as the books say to do), but when we got to that turn (Friday), we put the elbow on at too steep an angle, and the pipes didn't fit together.

We had to cut the pipes apart on the bathroom side of the footing before the turn out before continuing on. Cutting a round pipe straight with a saw is a challenge when you have it up on a sawhorse with one or two people holding it and rotating it for you, which is why I am glad I had a bit of practice doing that before trying to cut it 'in the hole'. It came out very straight considering I couldn't turn the pipe to make sure the cut was straight, and I was cutting in a trench filled with gravel.

Once we had this assembly disconnected, we cemented the pipe exiting the building (with lots of pulling, pushing and cajoling the pipe and the 4-4-3 wye it connects to). We let that connection set and cure Friday night and Saturday (it rained like the dickens all day) and Sunday, we went back and reconnected the pipes we cut apart with a 4" double hub. Wendy called the building inspector this morning, who said he would go up and look at it this morning and call us if there was any problem. Being as today has come and gone and we got no calls, the only answer is that our DWV has passed and we are go for radiant heat and then a slab.

We started removing an inch of gravel (plus what we had to displace for the plumbing) so we can put the 1" of foam board under the radiant heat and flush with the footings. Let me tell you - there is way more gravel in an inch over 720 sq feet than you would ever guess. We had piles of it in the foundation, and Wendy, her mom and the kids spent a good couple of hours this afternoon moving all size containers full of gravel out so we can get the radiant in.

Tuesday, May 15, 2007

Clean bill of mental health

I may not actually have a clean bill of mental health, but I do feel much better now. After talking to the foundation contractor and the architect yesterday, they both told me that the footings for this house are way over built and that even if the posts stand on the edge of the footing, they are OK.

We also met the foundation contractor today to go over one of the side effects of the footing move - where the tub should be in the basement is impossible. We would need to move it out 2-4 inches. into the room to make it work. He agreed to cut out some of the footing in the location so that we can at least get in to work on it later.

The water service sleeve was left out as they have a concrete drill to put the hole right where we need it instead of guessing, we just hadn't heard that yet. Now that we have these things worked out, we need to wait for the footing to be cut that so we can finish up our plumbing.

We tried to get some of this done in the rain that was falling at the site, but in the meantime, we will get started on the radiant heat tomorrow night, assuming it isn't raining.

Sean, chilling beneath the front door

Sunday, May 13, 2007

Ready or not, here we plumb!

To all the plumbers we called and never heard back from... Neener, neener, neener! We don't need you!

Pop instructs Sean in the fine art of plumbing DWV line

We called almost 2 handfuls of plumbers to get quotes over the past 2 months. We only ever heard back from one, who got a copy of the floorplan, called to ask a couple of questions, told us he would get us a quote in a couple of days and promptly disappeared.

By the time we got to that point, we knew that we would have to do it ourselves anyhow. I got a couple of books on plumbing from the library, and a copy of the Residential Building Code, and tried to figure it out. Having to do this myself has made a huge mess of my head. I spent a week feeling like the kid who hadn't been to class in weeks and realized today was the final.

OK, so it isn't as simple as it looks in the picture. Fortunately, my father came up to help us out. Having him there was a huge boon. He gave me the confidence to get my hands into it and the guidance to keep me moving in the right direction, and for that and everything else he has done for me in my life, I owe him big. Of course, this is just the beginning of this journey, and I am sure that I will rack up some more debt. Someday I hope I can pay him back in spades.


The good news is that the foundation is up and the forms are off of it! We have walls and footings and windows even!

The foundation, stripped of its forms

The downside is that after today, it looks like there may be a couple of problems. One of the interior footings is off by 9 inches (too close to the center of the house). The other interior footing is also off, as they are 12 feet apart, but it is 9 inches to close to the outside of the house. We have to figure out how this impacts us, as we can't move the posts in the basement - they go all the way up to the roof and the engineering of the whole house would be affected. Also, the sleeve for the water service from the well is not in.

Suffice it to say that things are tense right now. We need to talk to our foundation guy and our architect to see what the impacts are and what can be done to fix it.

Thursday, May 10, 2007

Taking Form

I took an early morning ride up to the site to see if the walls had been poured on the footings yet. Much to my satisfaction, the foundation forms had been put up and the walls had been poured. Sadly, I couldn't get into it, as the concrete was still wet.

The walls formed and poured on the footings'

Took a late ride with my father-in-law to get the DWV pipe, fittings and supplies for putting down the radiant floor and drop them off at the site. We didn't get there until 9pm and didn't get home until 10:30pm or so, so thank you for your help and patience Tom! Both the DWV and the radiant have to be put in before the floor slab can be poured. Since we had problems getting hold of plumbers, we will have to do both to keep things moving along.

Friday, May 4, 2007

And Away We Go!

Well, the footings are in. I took a ride during lunch today up to the property to take a look at what they had done.

The footings for our house

They really are nice footings. I guess they were there until 7pm or so Monday night hammering the ledge out so they could get started with the footings Tuesday. While I was there today they were backfilling the footings and drains with gravel.

Filling around and inside the footings with gravel

They expect to put up the wall forms on Monday and pour them on Tuesday, which means that we will need to do our plumbing for the DWV (Drain/Waste/Vent - the line out to the Septic tank and the in slab plumbing for the master bath) and our in-slab radiant heat next weekend so they can pour the floor the week after that, before we get started building. Va Va Va VOOM!

Wednesday, May 2, 2007

Between a Rock and a Hard Place

We went up to the land two Saturdays ago, met the excavator and foundation guy, and cut some of the downed wood that is piled in the way between the house and the power line. We showed them where the house should go and where the septic tank is for their reference. They said they wouldn't be up there until the middle of last week, as they had a driveway to do early in the week.

Meanwhile, on Monday morning, I woke up and my right knee hurt. I got up and it seemed OK, so I did my morning regimen - 60 hindu squats, 20 hindu pushups and 20 situps. By the time I got to work, my knee was feeling pretty stiff. By the time I went home and had dinner it was very painful and swollen. I worked from home for the next few days and had the doc-in-a-box look at it. They X-rayed, they ultrasounded, but to no avail. Nothing broken, just a sprained knee. By Friday I was back at work, albeit on crutches. A good omen for building? Getting hurt already is bad, but I am recovering quickly.

I got to work Friday and there was a fresh fax on my desk from the excavator, asking me to call them right away. I called and they told me that they had started digging and hit solid rock, and that they would like to meet us on Saturday to look at it and discuss our options. We set a time and I gave them all of our contact information (they faxed because it was the only contact info they could find for us). Wendy and I worried what we would see and find out the next day, since the conversation had been pretty brief, not really describing anything and emphasizing the words solid rock. We consoled ourselves with the words from the Gospel according to Matthew:

And the rain descended, and the floods came, and the winds blew, and beat upon that house; and it fell not: for it was founded upon a rock.

Rock ledge in the southwest corner of the cellar hole

We got up there on Saturday to find that they had dug almost the entire hole before finding the rock in one corner. It was ledge for sure, and comes up pretty close to the top of the hole. It is a challenge and will cost us more, but it is not the end of the world. They own their own hammer attachment for their excavator, living and working in our neck of the woods, and said with 4-6 hours of work, they will be able to beat it into submission and continue on their way.

They expect to have the footings in and the wall forms started by the end of this week. Looks like this weekend is likely the last weekend of leisure for a while.

Me gimping about the site, looking at a hole with rocks in it