


Feeling a Bit Peak-ed
I have been a wreck this week. First, the rib I hurt was bothering me - especially sleeping. Then after going up and covering the wood Monday night (to let it dry out a bit from Saturday's rain and Sunday being cool) and nailing down the extra sill plate on the back of the house, my foot started hurting (and my elbow, from hammering from the ladder at a weird angle). The foot felt like it was broken when I moved it side to side Tuesday and Wednesday.
I was debating whether to work because of that and because some weather reports called for 80-90% chance of rain for most of the day, with thunderstorms in the evening. Anyway, the rib started feeling better and the foot and elbow hurt less today. The weather (after a brief, intense rainstorm) looked to be holding together, so we decided to go ahead and go to work.
Today's' adventure was to finally put up a peak and make sure it fits, so we can finish the major framing. Wendy had already measure out the 2x8s for the first peak rafter, and I cut them last Sunday, but never got back to them after the rib thing,
We still had to measure and cut the 2x4 in the middle of the rafter, but after figuring out how to make it work for the lower rafters, I found it simple to set the 2x4 correctly in the peak rafters. The secret for the bottom rafter is to line the 2x4 up with the bottom post, leaving it short a half inch or so for a little play (given a post that is wider than the norm), and then cut it an inch or two short where it matches up with the collar tie. We found on the first one we made that fitting the 2x4 exactly didn't work and we had to notch the bottom of the collar tie to allow the rafter to sit flush, as the rafter was already all spiked together.
The secret for the peak is to make the long 2x4 flush with the top of the peak, and then using a scrap from cutting the collar tie to figure out where the collar tie fits the peak rafter, and cut the 2x4 an inch or two shorter for fit, as with the lower rafter.
I got the 2x4s cut and then went up to the platform we had built on the collar ties. We took twelve 13' scaffold planks, and put them up in six groups of two with a small space in between them to create a work area the I used to nail the peak together. I set the work so that the ends were right near the collar tie that it is to sit on and aseembled it.
Once it was together, Wendy stood on the middle 4 planks (2 under each foot, straddling the space) and picked the peak up by the point. The ends rested on the planks near the edges of the collar ties, and she was able to stand it up right next to where it should go. I went to the ends, picked them up and put them down on the collar tie.
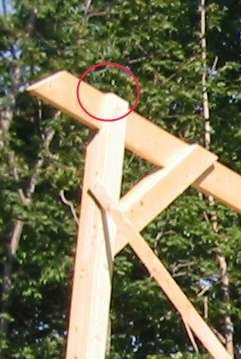
The only potential trouble zone we noticed is that the way the collar tie and the tops of the posts set, the rafter cannot sit down all the way on the collar tie. I used my hammer as a chisel and beat down the corner of the post on the top outside corner and the rafter dropped right into place. On future peak rafters we'll probably just use a chisel to knock off a quarter inch from the corner of the post, but in the heat of the moment I improvised.
Other than that, we had the first peak up. We went down to the main deck to cut another peak and made some templates to use for cutting the remaining pieces. By now the weather was starting to live up to its promises (we could hear the thunder coming) and we put the pieces up and got it put together and assembled before any weather broke. I braced the two peaks with some strapping to keep them together at least.
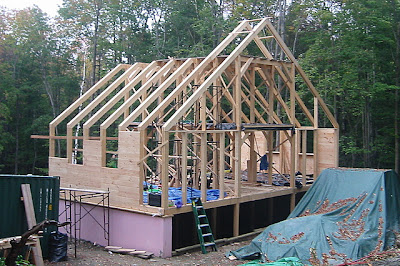
Just having the peak really makes the difference - it completes the hook of the house. The peaks are really very simple to put up once you know about the 2x4 shortcut, the platform and the trouble zone. Next time we work on peaks (Sunday perhaps - Pop is up Saturday to help us with the window framing), I will try to get some photos of the process to help illustrate it and our setup.
I was debating whether to work because of that and because some weather reports called for 80-90% chance of rain for most of the day, with thunderstorms in the evening. Anyway, the rib started feeling better and the foot and elbow hurt less today. The weather (after a brief, intense rainstorm) looked to be holding together, so we decided to go ahead and go to work.
Today's' adventure was to finally put up a peak and make sure it fits, so we can finish the major framing. Wendy had already measure out the 2x8s for the first peak rafter, and I cut them last Sunday, but never got back to them after the rib thing,
We still had to measure and cut the 2x4 in the middle of the rafter, but after figuring out how to make it work for the lower rafters, I found it simple to set the 2x4 correctly in the peak rafters. The secret for the bottom rafter is to line the 2x4 up with the bottom post, leaving it short a half inch or so for a little play (given a post that is wider than the norm), and then cut it an inch or two short where it matches up with the collar tie. We found on the first one we made that fitting the 2x4 exactly didn't work and we had to notch the bottom of the collar tie to allow the rafter to sit flush, as the rafter was already all spiked together.
The secret for the peak is to make the long 2x4 flush with the top of the peak, and then using a scrap from cutting the collar tie to figure out where the collar tie fits the peak rafter, and cut the 2x4 an inch or two shorter for fit, as with the lower rafter.
I got the 2x4s cut and then went up to the platform we had built on the collar ties. We took twelve 13' scaffold planks, and put them up in six groups of two with a small space in between them to create a work area the I used to nail the peak together. I set the work so that the ends were right near the collar tie that it is to sit on and aseembled it.
Once it was together, Wendy stood on the middle 4 planks (2 under each foot, straddling the space) and picked the peak up by the point. The ends rested on the planks near the edges of the collar ties, and she was able to stand it up right next to where it should go. I went to the ends, picked them up and put them down on the collar tie.
The only potential trouble zone we noticed is that the way the collar tie and the tops of the posts set, the rafter cannot sit down all the way on the collar tie. I used my hammer as a chisel and beat down the corner of the post on the top outside corner and the rafter dropped right into place. On future peak rafters we'll probably just use a chisel to knock off a quarter inch from the corner of the post, but in the heat of the moment I improvised.
Other than that, we had the first peak up. We went down to the main deck to cut another peak and made some templates to use for cutting the remaining pieces. By now the weather was starting to live up to its promises (we could hear the thunder coming) and we put the pieces up and got it put together and assembled before any weather broke. I braced the two peaks with some strapping to keep them together at least.
Just having the peak really makes the difference - it completes the hook of the house. The peaks are really very simple to put up once you know about the 2x4 shortcut, the platform and the trouble zone. Next time we work on peaks (Sunday perhaps - Pop is up Saturday to help us with the window framing), I will try to get some photos of the process to help illustrate it and our setup.
posted by SKelly | 8:42 PM
![]()
![]()
0 Comments:
Post a Comment
<< Home